Creating Actions from a Dashboard
Creating Actions from a Dashboard
Jul 14, 2021
—
TagoIO Team
We know that a lot of developers love the ability to create Actions with our IoT platform, but we also understand that this can get a bit tricky, especially if your customers are looking to do it themselves. So if you’ve ever wanted to let your end-users create and set up their own alert notifications, using a dashboard to do so might just be the solution you — and your end-users — have been looking for.
To actually do this, we’ll be referencing a really useful, yet more technical guide on our documentation.
First thing you have to do is set up the Analysis by installing this template and setting up the Environment variable tab by giving it an account token, which you can find by going to your Profile, then heading over to the Tokens tab and generating a new one that you should set to never expire. From there, you simply have to copy the token (by clicking the Copy Button) and putting it on the Environment variables tab right where it asks for your account-token.
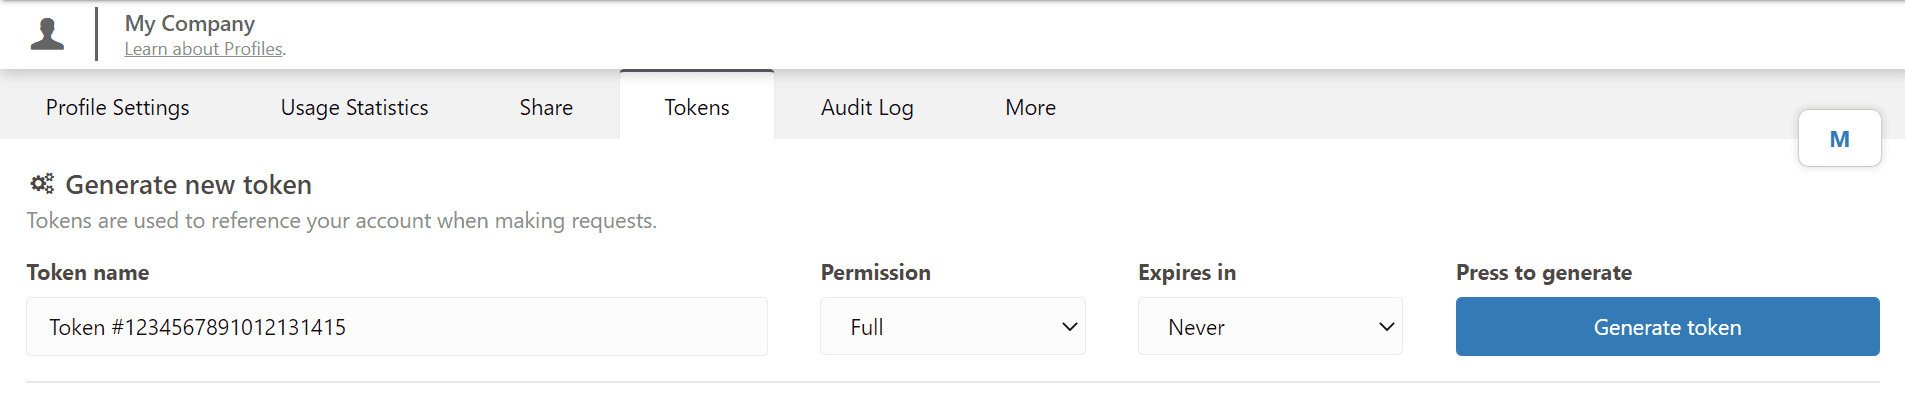
Which you can find by going to your Profile, then heading over to the Tokens tab and generating a new one that you should set to never expire.

And putting it on the Environment variables tab right where it asks for your account-token
Next you’ll need to get a Dashboard set up, which we’ll do by simply installing this template, confirming all the prompted settings, and then selecting the Analysis that we just previously set up. With this Analysis associated with our dashboard, we can now move on to setting up our devices to work with this Blueprint Dashboard. You’ll need to go to each device’s settings that you’ll be using and add a tag with the key can_create, and the value actions. This being because that’s what this Blueprint Dashboard requires from us, as it’s able to use any device and dynamically change accordingly, as long as they have that tag key and value as we can observe in the Blueprint Dashboard’s settings itself (which you could change to something else if you needed to).
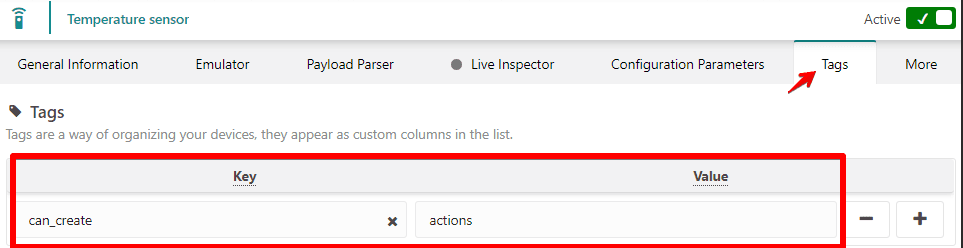
You’ll need to go to each device’s settings that you’ll be using and add a tag with the key can_create, and the value actions.
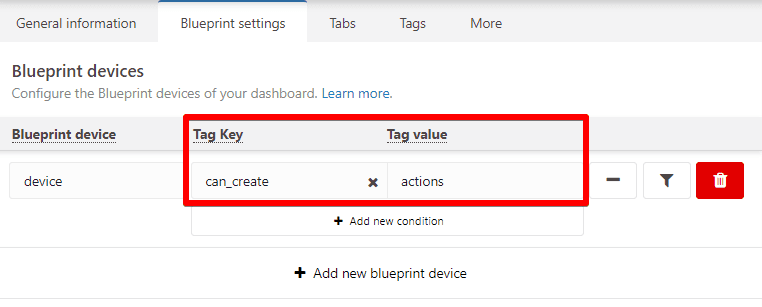
This being because that’s what this Blueprint Dashboard requires from us, as it’s able to use any device and dynamically change accordingly, as long as they have that tag key and value as we can observe in the Blueprint Dashboard’s settings itself (which you could change to something else if you needed to)
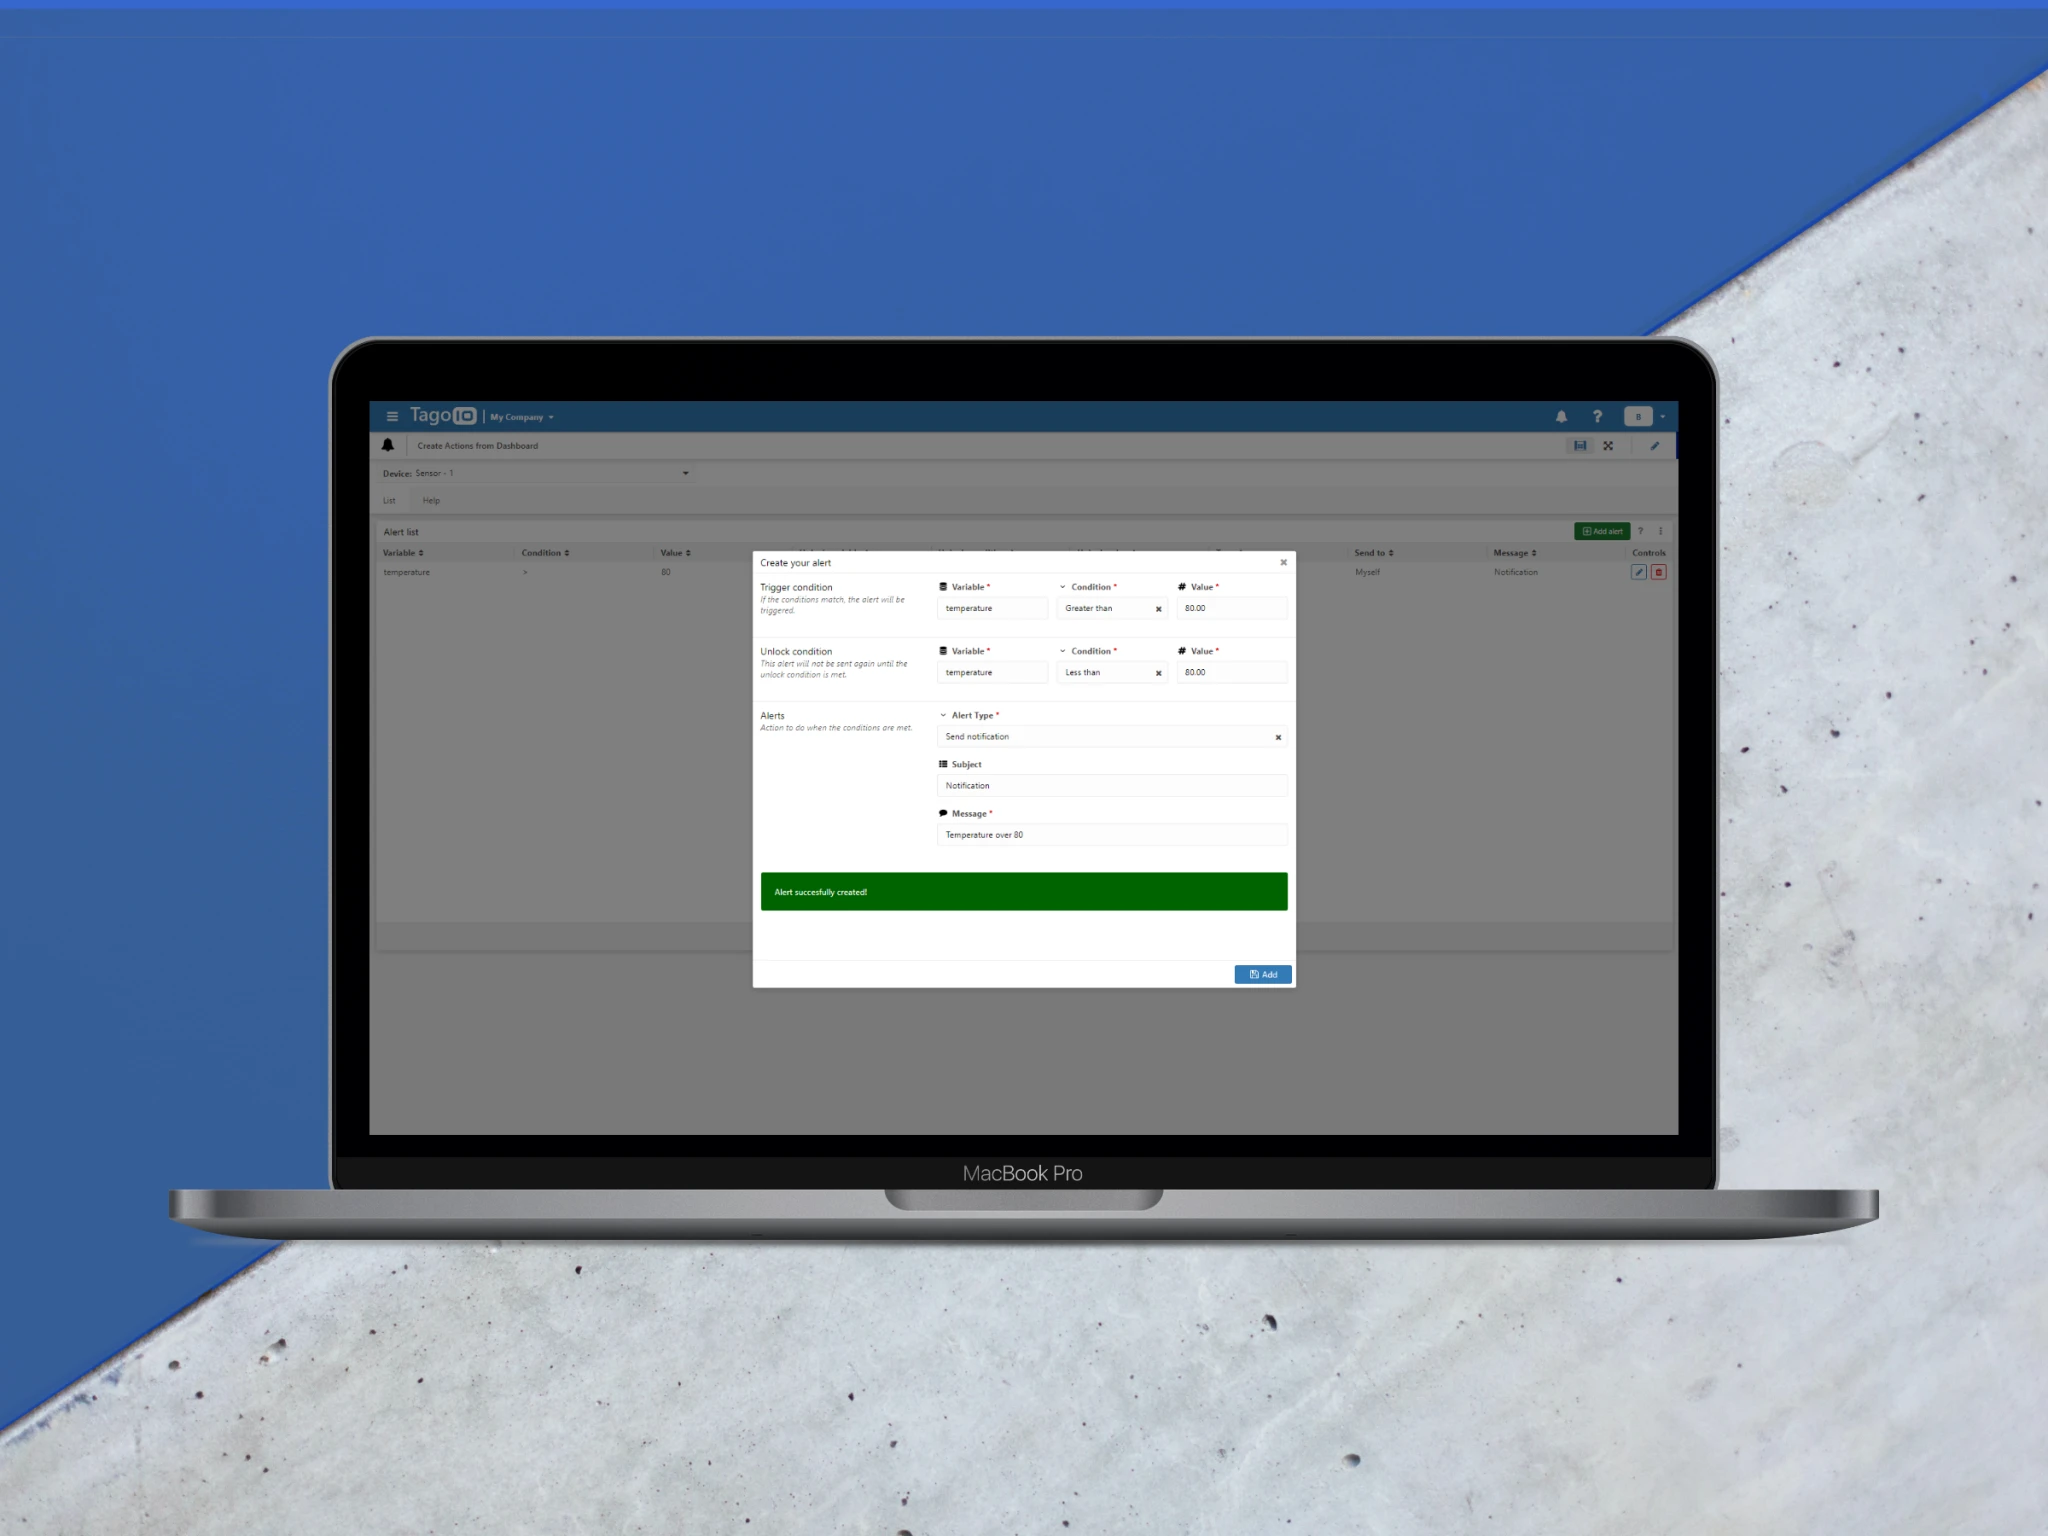
If we have that all set up, now you can start selecting devices to use on the dashboard that have that tag. And at this point, we should pay attention to this dashboard’s tabs, which include List, and Help. But what’s important to note here is that a developer, when you click on the edit dashboard button (the pencil icon on the top right), a new tab pops up, aptly called Hidden tab. This tab is where all of the alerts are actually going to be created, and this process is really simple, as you just have to set the trigger conditions, the unlock conditions, and what type of alert you want the action to be. Once you click add, your alert will be saved and it’ll be placed over on the List tab. But as we can see, this Hidden tab is inherently hidden, so that’s why it’s been made available on the List tab itself when you click on the green Add alert button. When you click on this button, the same set of prompts show up as was on the Hidden tab, but this one is readily available to be used without having to switch off from the List tab.
When you click on the edit dashboard button (the pencil icon on the top right)

A new tab pops up, aptly called Hidden tab

So that’s why it’s been made available on the List tab itself when you click on the green Add alert button
Now that we have the dashboard and the devices set up to interact with it, we just need to give your end-users permission to access the dashboard. This step requires you to have TagoRUN enabled in your account, which you can simply do, if you haven’t already, by going to the Run button on the sidebar and generating your RUN and a URL for your users to login through.
If you want a more in-depth explanation or guide to TagoRUN, make sure to learn more about it on our documentation.
For any of your users to actually login however, you’ll have to have those users in your account, which can easily be setup by clicking on the Users button in your sidebar and adding them through there! Now when you click on the Access button on your sidebar, you’ll be able to create access policies so that you can determine exactly what your users will have access to. With what we’ve been working with, you’ll need to create a policy with the following information:
Enter whatever policy name you want
Set the Targets to Run user with field ID equal to [The name of your user]
Set two permissions with the following information
Allow Dashboard with rules Access with field ID equal to [The name of your dashboard]
Allow Device with rules Blueprint Access with field Tag equal to can_create : actions
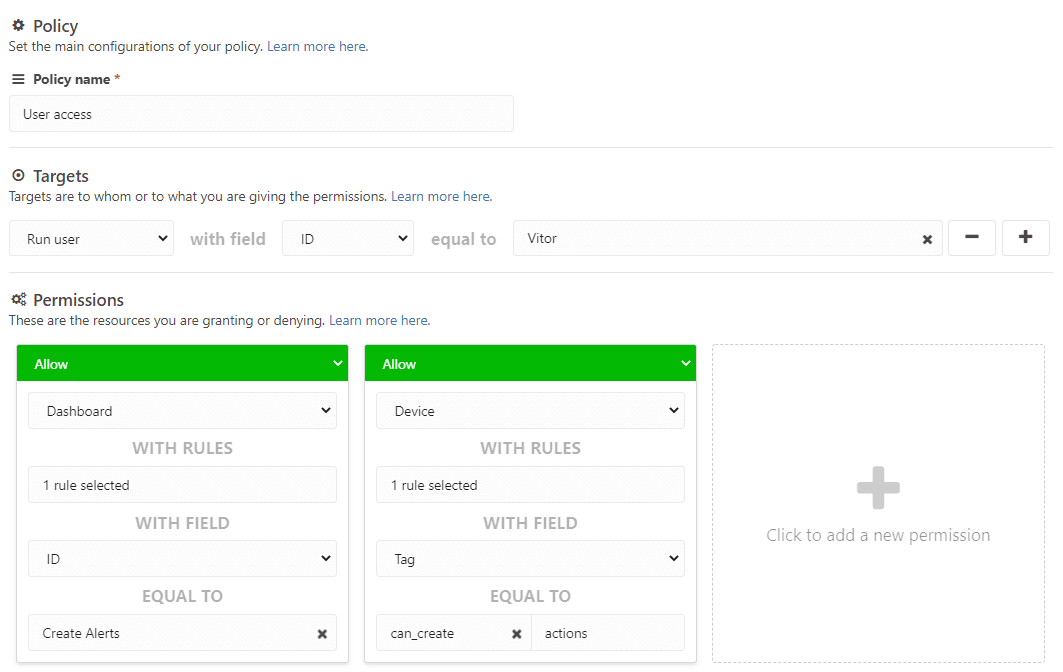
You’ll need to create a policy with the following information
With all of that done, your end-users should fully be able to access that dashboard and use their own devices to easily create Actions! Following the steps that we’ve gone through here, there’s a lot of customization available to you as the developer so that no matter your application needs, you’ll be able to meet them!
We know that a lot of developers love the ability to create Actions with our IoT platform, but we also understand that this can get a bit tricky, especially if your customers are looking to do it themselves. So if you’ve ever wanted to let your end-users create and set up their own alert notifications, using a dashboard to do so might just be the solution you — and your end-users — have been looking for.
To actually do this, we’ll be referencing a really useful, yet more technical guide on our documentation.
First thing you have to do is set up the Analysis by installing this template and setting up the Environment variable tab by giving it an account token, which you can find by going to your Profile, then heading over to the Tokens tab and generating a new one that you should set to never expire. From there, you simply have to copy the token (by clicking the Copy Button) and putting it on the Environment variables tab right where it asks for your account-token.
Which you can find by going to your Profile, then heading over to the Tokens tab and generating a new one that you should set to never expire.
And putting it on the Environment variables tab right where it asks for your account-token
Next you’ll need to get a Dashboard set up, which we’ll do by simply installing this template, confirming all the prompted settings, and then selecting the Analysis that we just previously set up. With this Analysis associated with our dashboard, we can now move on to setting up our devices to work with this Blueprint Dashboard. You’ll need to go to each device’s settings that you’ll be using and add a tag with the key can_create, and the value actions. This being because that’s what this Blueprint Dashboard requires from us, as it’s able to use any device and dynamically change accordingly, as long as they have that tag key and value as we can observe in the Blueprint Dashboard’s settings itself (which you could change to something else if you needed to).
You’ll need to go to each device’s settings that you’ll be using and add a tag with the key can_create, and the value actions.
This being because that’s what this Blueprint Dashboard requires from us, as it’s able to use any device and dynamically change accordingly, as long as they have that tag key and value as we can observe in the Blueprint Dashboard’s settings itself (which you could change to something else if you needed to)
If we have that all set up, now you can start selecting devices to use on the dashboard that have that tag. And at this point, we should pay attention to this dashboard’s tabs, which include List, and Help. But what’s important to note here is that a developer, when you click on the edit dashboard button (the pencil icon on the top right), a new tab pops up, aptly called Hidden tab. This tab is where all of the alerts are actually going to be created, and this process is really simple, as you just have to set the trigger conditions, the unlock conditions, and what type of alert you want the action to be. Once you click add, your alert will be saved and it’ll be placed over on the List tab. But as we can see, this Hidden tab is inherently hidden, so that’s why it’s been made available on the List tab itself when you click on the green Add alert button. When you click on this button, the same set of prompts show up as was on the Hidden tab, but this one is readily available to be used without having to switch off from the List tab.
When you click on the edit dashboard button (the pencil icon on the top right)
A new tab pops up, aptly called Hidden tab
So that’s why it’s been made available on the List tab itself when you click on the green Add alert button
Now that we have the dashboard and the devices set up to interact with it, we just need to give your end-users permission to access the dashboard. This step requires you to have TagoRUN enabled in your account, which you can simply do, if you haven’t already, by going to the Run button on the sidebar and generating your RUN and a URL for your users to login through.
If you want a more in-depth explanation or guide to TagoRUN, make sure to learn more about it on our documentation.
For any of your users to actually login however, you’ll have to have those users in your account, which can easily be setup by clicking on the Users button in your sidebar and adding them through there! Now when you click on the Access button on your sidebar, you’ll be able to create access policies so that you can determine exactly what your users will have access to. With what we’ve been working with, you’ll need to create a policy with the following information:
Enter whatever policy name you want
Set the Targets to Run user with field ID equal to [The name of your user]
Set two permissions with the following information
Allow Dashboard with rules Access with field ID equal to [The name of your dashboard]
Allow Device with rules Blueprint Access with field Tag equal to can_create : actions
You’ll need to create a policy with the following information
With all of that done, your end-users should fully be able to access that dashboard and use their own devices to easily create Actions! Following the steps that we’ve gone through here, there’s a lot of customization available to you as the developer so that no matter your application needs, you’ll be able to meet them!
